Prerequisites
Congratulations on starting your data science journey! In this chapter, we’re going to help you install or access the tools you need to start learning and doing data science. We’ve made a few assumptions about what you already know in order to get the most out of this book. You should be generally numerically literate, and it’s helpful if you have some programming experience already.
Introduction
We’ll be helping you get set up with:
- an integrated development environment, or IDE, a place to write and run code
- an installation of Python, so that your computer can interpret and execute Python code
- installing packages, which extend the functionality of Python
While there will be much more information on the how to come, let’s first spend a moment explaining what these are.
Integrated development environment, or IDE
An integrated development environment (IDE) is a software application that provides a few tools to make coding easier. The most important of these is a way to write the code itself! IDEs are not the only way to programme, but they are perhaps the most useful. Note that the language and the place you write the language (the IDE) are separate things: the language is a way of processing your instructions, the IDE is where you write those instructions. There are a lot of integrated development environments (IDEs) out there. This book strongly recommends Microsoft’s Visual Studio Code, which works on all major operating systems and is one of the most popular. Here are some of the useful features that Visual Studio Code provides:
a way to run your code interactively (line-by-line) or all at once
a way to debug (look for errors) in your code
a quick way to access helpful information about commonly used software packages
automatic code formatting, so that your code follows best practice guidelines
auto-completion of your code when you hit TAB
automatic code checking for basic errors
colouring your brackets in pairs so you can keep track of the logical order of execution of your code!
A Python interpreter
Python is both a programming language that you can read, and a language that computers can read, interpret, and then carry out instructions based on. For your computer to be able to read and execute Python code, you will need to get Python installed on your computer. There are lots of ways to install a Python “interpreter” on your computer, but this book recommends the uv distribution of Python for its flexibility and simplicity.
Packages
A Python package is a collection of functions, data, and documentation that extends the capabilities of an installed version of Python. Using packages is key to most data science because most of the functionality we’ll need comes from extra packages. You’ll see statetments like import numpy as np at the start of many Python code scripts—these are instructions to use an installed package (here one called numpy) and to give it a shortened name (np, for convenience) in the rest of the script. The functions in the numpy package are then accessed through syntax like np.; for example, you can take logs with np.log(x) where x is a variable containing a number. You need only install packages once.
Typical workflow
The typical workflow for analysis with code might be something like this:
- Open up your integrated development environment (IDE)
- Write some code in a script (a text file with code in) in your IDE
- If necessary for the analysis that you’re doing, install any extra packages
- Use the IDE to send bits of code from the script, or the entire script, to be executed by Python and add-on packages, and to display results
We’ll see two ways to achieve this workflow:
- Installing an IDE, Python, and any extra packages on your own computer
- Using a computer in the cloud that you access through your internet browser. The cloud computer has an IDE and Python built-in, and you can easily install extra packages in it too. However, the free version is limited to 60 hours / month.
You should pick whichever you’re more comfortable with! Eventually, you’ll probably try both.
How to get started on your own computer
These instructions are for if you’re going to work with Python locally, on your own computer.
Installing Python
Installing Python
To download and install Python, we’ll use the uv “distribution” of Python, which is available on all major operating systems. To install it, follow the instructions at this website. Unlike installing normal programmes, we’re going to use the command line to install Python. Linux, Mac, and Windows all have built-in command lines: search for Terminal on Mac or Linux, and Powershell on Windows. These apps will bring up boxes that you can type commands in. As of the time of writing, the commands are:
curl -LsSf https://astral.sh/uv/install.sh | shfor Linux and Mac, and
powershell -ExecutionPolicy ByPass -c "irm https://astral.sh/uv/install.ps1 | iex"for Windows. Hit return to execute the commands.
Once you have installed uv, you can check it’s installed properly by running uv --version. You should see a message pop up that says “uv” and then the latest version number.
We didn’t actually download Python yet–we downloaded uv, which is going to manage our Python environment. So next we need to run
uv python installInstalling your integrated development environment, Visual Studio Code
Visual Studio Code is a free and open source IDE from Microsoft that is available on all major operating systems. Just like Python itself, Visual Studio can be extended with packages, and it is those packages, called extensions in this case, that make it so useful. As well as Python, Visual Studio Code supports a ton of other languages.
Download and install Visual Studio Code. If you need some help, there is a video below that will walk you through downloading and installing Visual Studio Code, and then using it to run Python code in both scripts and in notebooks. We’ll go through these instructions in detail in the rest of this chapter.
Note that if you are testing out notebooks and the interactive window, you will need to create a new folder and work in it in Visual Studio Code. Once you’ve opened a folder explicitly in VS Code, open the command line within Visual Studio Code then run uv init to create a Python installation, and uv add jupyter to provide this nascent Python environment with the means to create interactive windows.
How to install Visual Studio Code and use it to run Python code
Data science in the cloud
These instructions are for if you’re planning to do your data science remotely, using a computer in the cloud.
There are many ways to do data science in the cloud, but we’re going to share with you the absolute simplest. For this, you will need to sign up for a Github Account. Github is an organisation that’s owned by Microsoft and which provides a range of services including a way to back-up code on the cloud, and cloud computing. One of the services offered is Github Codespaces. A GitHub Codespace is an online cloud computer that you connect to from your browser window. It has a generous 60 hours free of computing per month.
If you go over the free tier hours on Github Codespaces, your credit card will be charged for any further hours of GitHub Codespaces you use.
Once you’ve signed up for a Github account, head to Github Codespaces and click on “Get Started for Free”. You should see a menu of “quick start templates”. Under where it says “Jupyter Notebook”, hit “Use this template”.
You will find that a new page loads with several panels in. This is an online version of Visual Studio Code that works much like if you had installed it on your own computer. It will already have a version of Python installed—you can check which one by running python --version in the terminal. The terminal is usually found in the lowest panel of Visual Studio Code, and, in Codespaces, will typically display a welcome message.
However, you should note that the distribution of Python on Codespaces might be different to the uv one we’re using in the book. But you can install uv in your codespaces machine and follow the other instructions from the “Installing Python” section above.
Running your first Python code
Getting to grips with Visual Studio Code
Once you have Visual Studio Code installed and opened (either on your own computer or in the cloud), navigate to the ‘extensions’ tab on the left hand side vertical bar of icons (it’s the one that looks like 4 squares). You’ll need to install the Python extension for VS Code, which you can search for by using the text box within VS Code’s extensions panel. If you’re using the cloud version, you may find that it’s already installed.
There are some other extensions it’s useful to have and install (if they aren’t already):
- Jupyter
- Pylance
- indent-rainbow
Although you won’t have any Python code to play with yet, or an interactive window to execute that Python code, it’s worth us spending a brief moment familiarising ourselves with the different bits of a typical view in Visual Studio Code.
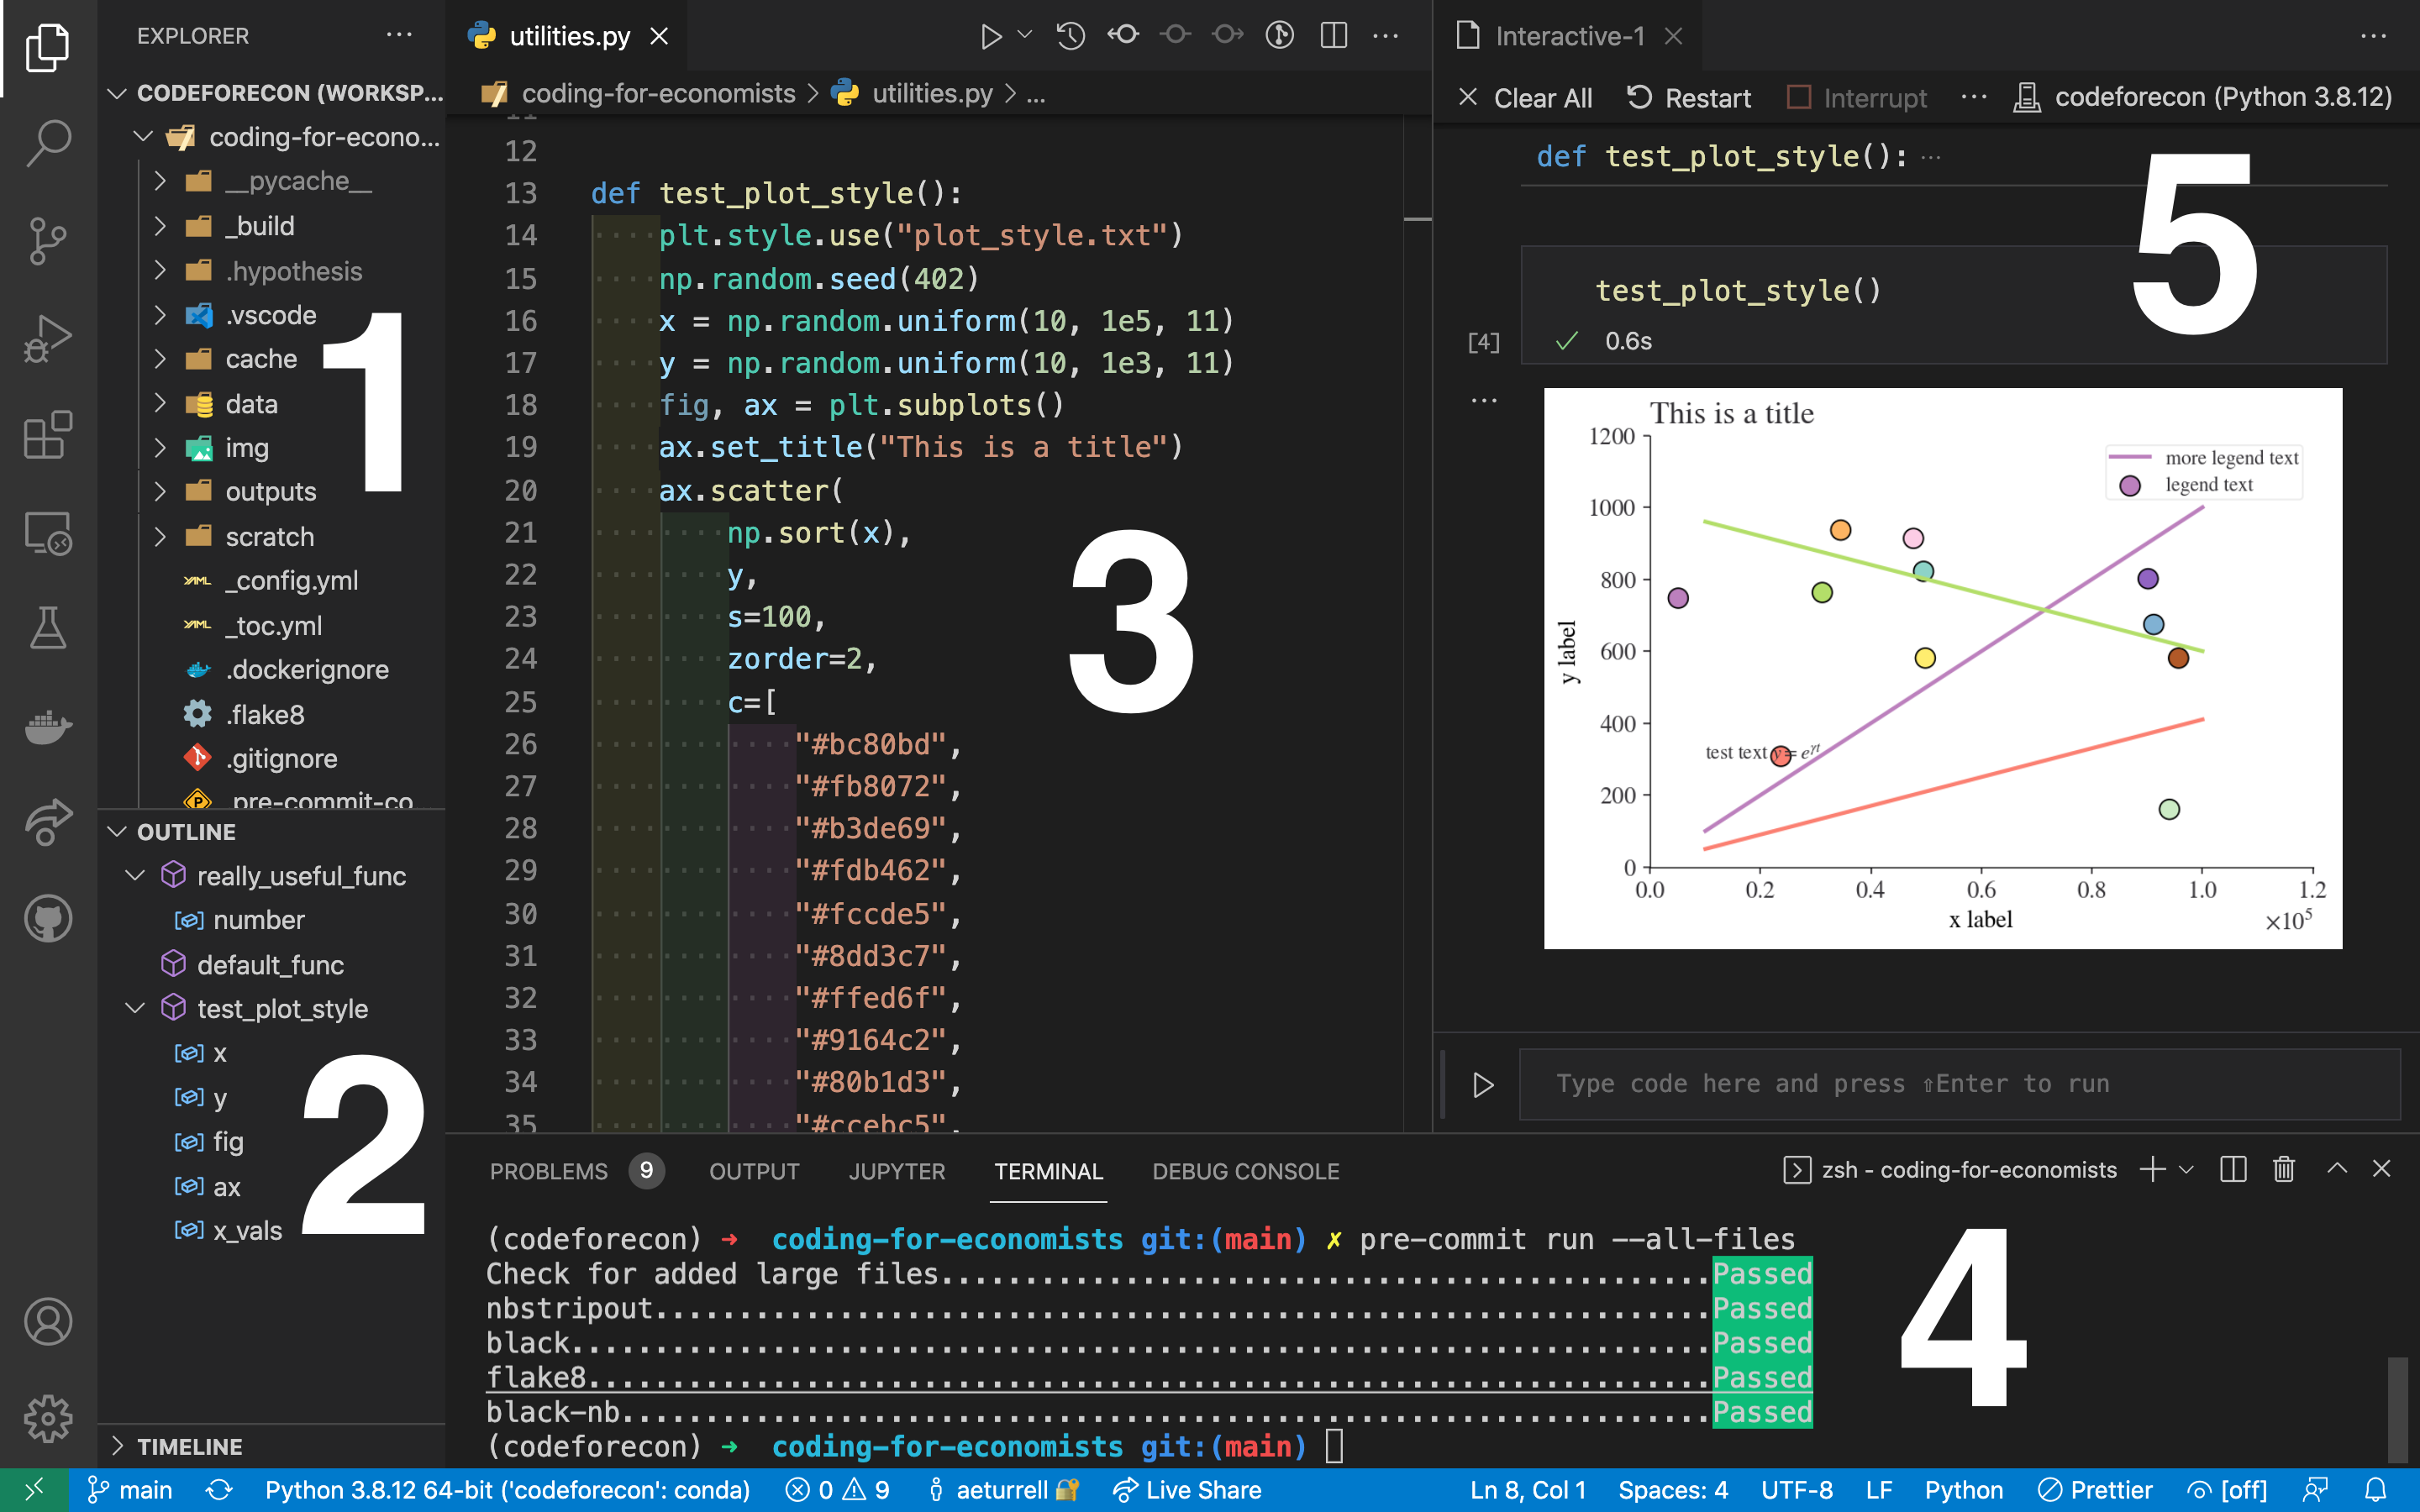
The figure above shows the typical layout of Visual Studio Code once you have a Python session running, and a Python script open. The long vertical panel on the far left-hand side changes what is seen in panels 1 and 2; it currently has the file explorer selected. Let’s run through the numbered parts of the figure.
- When the explorer option is selected from the icons to the left of 1 and 2, the contents of the folder that’s currently open are shown in 1.
- This is an outline of the key parts of the file that is open in 3.
- This is just a fancy text editor. In the figure above, it’s showing a Python script (a file that contains code and has a name that ends in
.py). Shortly, we’ll see how selecting code and pressing Shift + Enter (‘Enter’ is labelled as ‘Return’ on some keyboards) will execute code whose results appear in panel 5. - This is the command line or terminal, a place where you can type in commands that your computer will then execute. If you want to try a command, type
date(Mac/Linux) ordate /t(Windows). This is where we install extra packages. - This is the interactive Python window, which is where code and code outputs appear after you select and execute them from a script (see 3). It shows the code that you executed and any outputs from that execution—in the screenshot shown, the code has created a plot. The name and version of Python you’re using appear at the top of the interactive window.
Note that there is lots of useful information arrayed right at the bottom of the window in the blue bar, including the version of Python currently being used by VS Code.
Running Python code
Now you will create and run your first code. If you get stuck, there’s a more in-depth tutorial over at the VS Code documentation.
In Visual Studio Code, click on the “Explorer” symbol (some files on the left-hand side of the screen) to bring up a file explorer. Check you’re in a good location on your computer to try things out and, if not, change the folder you’re in using File -> Open Folder until you’re happy.
Now open up a terminal within Visual Studio Code. Make sure it’s the same type of terminal that you installed uv in, eg use Powershell on Windows (you can select to use different types of terminals.) The shortcut to open the terminal panel is Ctrl + ` on Linux and Windows, and Cmd + ` on Mac. The terminal panel appears along the bottom of VS Code. Run uv init in the terminal to initiate an installation of Python. This Python installation only lives in your current folder. Then, to install the package we need for this section run uv add jupyter. (We will cover the terminal and installing packages in much more detail shortly.)
Now, still with the explorer panel open on the left hand side, click on the symbol that looks like a blank piece of paper with a “+” sign on it. This will create a new file, and your cursor should move to name it. Name it hello_world.py. The file extension, .py, is very important as it implicitly tells Visual Studio Code that this is a Python script.
In the Visual Studio Code editor, add a single line to the file:
print('Hello World!')Save the file.
If you named this file with the extension .py then VS Code will recognise that it is Python code and you should see the name and version of Python pop up in the bar at the bottom of your VS Code window. (You can have multiple versions of Python installed—if you ever want to change which Python version your code uses, click on the version shown in the bar and select the version you want.)
Alright, shall we actually run some code? Select/highlight the print("Hello world!") text you typed in the file and right-click. You’ll get a lot of options here, but the one you want is “Run Selection/Line in Interactive Window”.
This should cause a new ‘interactive’ panel to appear within Visual Studio Code, and, hey presto you should see:
print("Hello world!")Hello world!The interactive window is a convenient and flexible way to run code that you have open in a script or that you type directly into the interactive window code box. The interactive window will ‘remember’ any variables that have been assigned (for examples, code statements like x = 5), whether they came from running some lines in your script or from you typing them in directly. Working with the interactive window will feel familiar to anyone who has used Stata, Matlab, or R. It doesn’t require you to write the whole script, start to finish, ahead of time. Instead, you can jam, changing code as you go, (re-)running it line by line.
It would be cumbersome to have to right-click every time we wanted to run some code, so we’re going to make a keyboard shortcut to send whatever code is highlighted to the interactive window to be executed. To do this:
- Open up the Visual Studio Code configuration menu (the cog on the lower left-hand side)
- Go to Settings
- Type “jupyter send” in the box to make an entry “Interactive Window > Text Editor: Execute Selection” appear
- Ensure the box next to this entry is ticked
Now return to your script, put your cursor on the line with print("Hello world!") on, and hit Shift+Enter. You should see “Hello world!” appear again, only this time, it was much easier.
The interactive window isn’t the only way to run code; you can do it in the terminal too. This is less popular for data science, but it does occasionally have its uses. If you want to do this, right-click on the selected code and choose “Run Python -> Run Selection/Line in Terminal”.
Let’s make more use of the interactive window. At the bottom of it, there is a box that says ‘Type code here and press shift-enter to run’. Go ahead and type print('Hello World!') directly in there to achieve the same effect as running the line from your script. Also, any variables you run in the interactive window (from your script or directly by entering them in the box) will persist.
To see how variables persist, type hello_string = 'Hello World!' into the interactive window’s code entry box and hit shift-enter. If you now type hello_string and hit shift+enter, you will see the contents of the variable you just created. You can also click the grid symbol at the top of the interactive window (between the stop symbol and the save file symbol); this is the variable explorer and will pop open a panel showing all of the variables you’ve created in this interactive session. You should see one called hello_string of type str with a value Hello World!.
This shows the two ways of working with the interactive window–running (segments) from a script, or writing code directly in the entry box. It doesn’t matter which way you entered variables, they will all be remembered within that session in your interactive window.
In Visual Studio Code, you can ensure that the interactive window starts in the root directory of your project by setting “Jupyter: Notebook File Root” to ${workspaceFolder} in the Settings menu. For the integrated command line, change “Terminal › Integrated: Cwd” to ${workspaceFolder} too.
Create a new script that, when run, prints “Welcome to Python for Data Science” and run it in an interactive window.
Installing Packages
We use the terminal or command line within Visual Studio Code to install additional Python packages. In the figure earlier in the Chapter, this is labelled as panel number 4.
To install any packages within the Python environment in the folder you’re using in Visual Studio Code, enter the following in Visual Studio Code’s terminal (the same place where you just ran uv run python --version).
uv add packagenameand hit return. In the above, packagename might be pandas, for example. If you have problems installing, make sure that you are connected to the internet, and that PyPI (the Python package index) isn’t blocked by your firewall or proxy. You could try installing the data analysispackage polars this way, by running uv add polars. We’ll see how to use polars in later chapters, but if you want to know if it installed correctly, just look for the message saying “Successfully installed polars” followed by the version number.
You can see what packages you have previously installed by entering uv pip list into the command line.
There’ll be more on installing and using packages in Workflow: Packages and Environments.
If you have problems installing, make sure that you are connected to the internet, and that PyPI (the Python package index) isn’t blocked by your firewall or proxy.
Alternative ways to run the code from the book
As well as following this book using your own computer or on the cloud via Github Codespaces, you can run the code online through a few other options. The first is the easiest to get started with.
- Google Colab notebooks. Free for most use. You can launch most pages in this book interactively by using the ‘Colab’ button under the rocket symbol at the top of the page. It will be in the form of a notebook (which mixes code and text) rather than a script (.py file) but the code you write is the same. Note that you may need to update packages to the most recent versions. On Colab, you can do this by running
!pip install **packagename**in a code cell—note the extra exclamation mark, which tells Colab that this is an instruction for the operating system rather than for Python. - Gitpod Workspace. An alternative to Codespaces. This is a remote, cloud-based version of Visual Studio Code with Python installed and will run Python scripts. Note that the free tier covers 50 hours per month.