import matplotlib.pyplot as plt
import numpy as np
import pandas as pd

# Set seed for random numbers
seed_for_prng = 78557
prng = np.random.default_rng(
    seed_for_prng
) # prng=probabilistic random number generatorWorking with Data
Introduction
The previous chapter was just a quick tour of what can be done with a single tabular dataset (a ‘dataframe’). Dataframes are the most frequently used structure for working with data; they do everything a spreadsheet does and a whole lot more——as you’ll see! In this chapter, we’ll go deeper into working with data and dataframes.
In this chapter, you’ll get really good overview to the pandas package, the core data manipulation library in Python. There are other excellent packages for working with data in Python, for example polars, but there’s none as ubiquitous. The name is derived from ‘panel data’ but it’s suited to any tabular data, and can be used to work with more complex data structures too. We won’t cover reading in or writing data here; see Reading and Writing Files for more on that.
This chapter is hugely indebted to the fantastic Python Data Science Handbook by Jake Vanderplas. Remember, if you get stuck with pandas, there is brilliant documentation and a fantastic set of introductory tutorials on the pandas website. These notes are heavily indebted to those introductory tutorials.
Prerequisites
This chapter mainly uses the pandas and numpy packages. If you’re running this code, you may need to install these packages, which you can do using either conda install packagename or pip install packagename on your computer’s command line. If you’re running this page in Google Colab, you can install new packages by running !pip install packagename in a new code cell but you will need to restart the Colab notebook for the change to take effect. There’s a brief guide to installing packages in the Chapter on Preliminaries.
Using tidy data
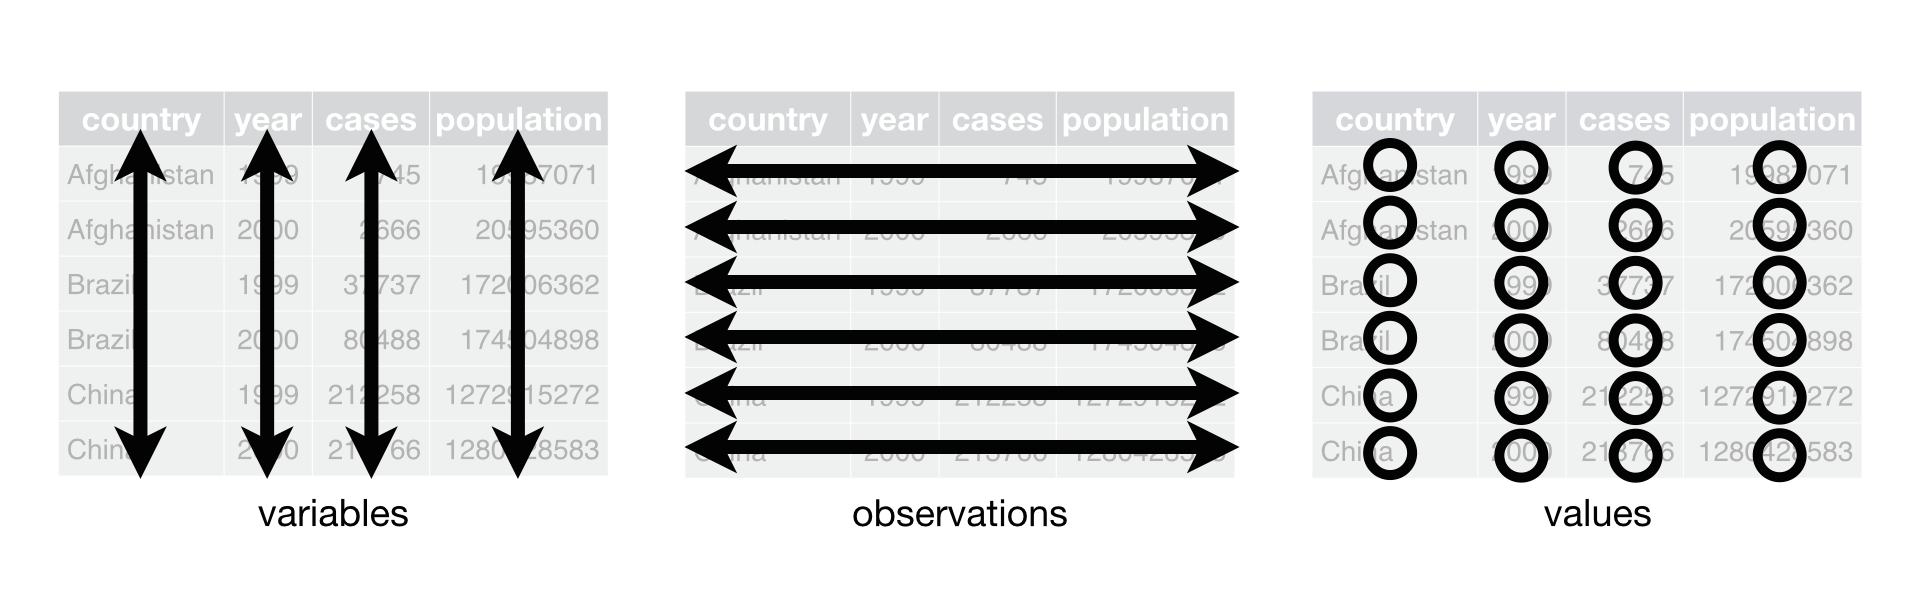
As an aside, if you’re working with tabular data, it’s good to try and use a so-called ‘tidy data’ format. This is data with one observation per row, and one variable per column, like so:
Tidy data aren’t going to be appropriate every time and in every case, but they’re a really, really good default for tabular data. Once you use it as your default, it’s easier to think about how to perform subsequent operations. Some plotting libraries (eg plotnine) take that your data are in tidy format as a given. And many operations that you can perform on dataframes (the objects that hold tabular data within many programming languages) are easier when you have tidy data. If you’re writing out data to file to share, putting it in tidy format is a really good idea.
Of course, getting your messy dataset into a tidy format may take a bit of work… but we’re about to enter the exciting world of coding for data analysis: the tools you’ll see in the rest of this chapter will help you to ‘wrangle’ even the most messy of datasets.
Having said that tidy data are great, and they are, one of standard data library pandas’ advantages relative to other data analysis libraries is that it isn’t too tied to tidy data and can navigate awkward non-tidy data manipulation tasks happily too.
Dataframes and Series
Let’s start with the absolute basics. The most basic pandas object is a dataframe. A dataframe is a 2-dimensional data structure that can store data of different types (including characters, integers, floating point values, categorical data, even lists) in columns.

Perhaps the single most important feature of pandas dataframes to remember is that the index, the special column on the left hand side that tracks the rows of data, is all important. Keep in mind the question, “what is the index doing in this operation” for every process you apply to a pandas dataframe and you won’t go far wrong.
We’ll now import the packages we’ll need for this chapter and set a random number seed (some examples use randomly generated data).
We’ll look at a dataframe of the penguins dataset (Horst et al. 2020). To show just the first 5 rows, we’ll be using the head() method (there’s also a tail() method).
# Now let's load up a dataset from the internet
penguins = pd.read_csv(
    "https://raw.githubusercontent.com/mwaskom/seaborn-data/master/penguins.csv"
)
penguins["sex"] = penguins["sex"].str.title()
penguins.head()| species | island | bill_length_mm | bill_depth_mm | flipper_length_mm | body_mass_g | sex | |
|---|---|---|---|---|---|---|---|
| 0 | Adelie | Torgersen | 39.1 | 18.7 | 181.0 | 3750.0 | Male |
| 1 | Adelie | Torgersen | 39.5 | 17.4 | 186.0 | 3800.0 | Female |
| 2 | Adelie | Torgersen | 40.3 | 18.0 | 195.0 | 3250.0 | Female |
| 3 | Adelie | Torgersen | NaN | NaN | NaN | NaN | NaN |
| 4 | Adelie | Torgersen | 36.7 | 19.3 | 193.0 | 3450.0 | Female |
What just happened? We loaded a pandas dataframe we named penguins and showed its contents. You can see the column names in bold, and the index on the left hand side. Just to double check it is a pandas dataframe, we can call type on penguins.
type(penguins)pandas.core.frame.DataFrameAnd if we want a bit more information about what we imported (including the datatypes of the columns):
penguins.info()<class 'pandas.core.frame.DataFrame'>
RangeIndex: 344 entries, 0 to 343
Data columns (total 7 columns):
# Column Non-Null Count Dtype
--- ------ -------------- -----
0 species 344 non-null object
1 island 344 non-null object
2 bill_length_mm 342 non-null float64
3 bill_depth_mm 342 non-null float64
4 flipper_length_mm 342 non-null float64
5 body_mass_g 342 non-null float64
6 sex 333 non-null object
dtypes: float64(4), object(3)
memory usage: 18.9+ KBRemember that everything in Python is an object, and our dataframe is no exception. Each dataframe is made up of a set of series that, in a dataframe, become columns: but you can turn a single series into a dataframe too.

Let’s see a couple of ways of creating some series from raw data:
# From a list:
s1 = pd.Series([1.0, 6.0, 19.0, 2.0])
s1
# From a dictionary
population_dict = {
"California": 38332521,
"Texas": 26448193,
"New York": 19651127,
"Florida": 19552860,
"Illinois": 12882135,
}
s2 = pd.Series(population_dict)
s2California 38332521
Texas 26448193
New York 19651127
Florida 19552860
Illinois 12882135
dtype: int64Note that in each case there is no column name (because this is a series, not a dataframe), and there is an index. The index is automatically created if we don’t specify it; in the third example, by passing a dictionary we implicitly asked for the index to be the locations we supplied.
TipExercise
Create a pandas series of ascending integers using the Python built-in range(start, stop) function.
If you ever need to get the data ‘out’ of a series or dataframe, you can just call the values method on the object:
s2.valuesarray([38332521, 26448193, 19651127, 19552860, 12882135])If you ever want to turn a series into a dataframe, just called pd.DataFrame(series) on it. Note that while series have an index and an object name (eg s2 above), they don’t have any column labels because they only have one column.
Now let’s try creating our own dataframe with more than one column of data using a dictionary:
df = pd.DataFrame(
    {
        "A": 1.0,
        "B": pd.Series(1, index=list(range(4)), dtype="float32"),
        "C": [3] * 4,
        "D": pd.Categorical(["test", "train", "test", "train"]),
        "E": "foo",
    }
)
df| A | B | C | D | E | |
|---|---|---|---|---|---|
| 0 | 1.0 | 1.0 | 3 | test | foo |
| 1 | 1.0 | 1.0 | 3 | train | foo |
| 2 | 1.0 | 1.0 | 3 | test | foo |
| 3 | 1.0 | 1.0 | 3 | train | foo |
Remember, curly brackets in the format {key: value} denote a dictionary. In the above example, the pd.DataFrame() function understands that any single value entries in the dictionary that is passed, such as {'A': 1.}, should be repeated as many times as are needed to match the longest series in the dictionary (4 in the above example).
TipExercise
Using a dictionary structure like the one above, create a pandas dataframe from the series you created in the previous exercise so that the name of the column is ‘series’.
Another way to create dataframes is to pass a bunch of series (note that index, columns, and dtype are optional–you can just specify the data):
df = pd.DataFrame(
    data=np.reshape(range(36), (6, 6)),
    index=["a", "b", "c", "d", "e", "f"],
    columns=["col" + str(i) for i in range(6)],
    dtype=float,
)
df| col0 | col1 | col2 | col3 | col4 | col5 | |
|---|---|---|---|---|---|---|
| a | 0.0 | 1.0 | 2.0 | 3.0 | 4.0 | 5.0 |
| b | 6.0 | 7.0 | 8.0 | 9.0 | 10.0 | 11.0 |
| c | 12.0 | 13.0 | 14.0 | 15.0 | 16.0 | 17.0 |
| d | 18.0 | 19.0 | 20.0 | 21.0 | 22.0 | 23.0 |
| e | 24.0 | 25.0 | 26.0 | 27.0 | 28.0 | 29.0 |
| f | 30.0 | 31.0 | 32.0 | 33.0 | 34.0 | 35.0 |
Note that reshape takes an input and puts it into a given shape (a 6 by 6 matrix in the above example).
TipExercise
Create a pandas dataframe using the data=, index=, and columns= keyword arguments. The data should consist of one column with ascending integers from 0 to 5, the column name should be “series”, and the index should be the first 6 letters of the alphabet. Remember that the index and columns keyword arguments expect an iterable of some kind (not just a string).
Values, Columns, and the Index
You’ll have seen that there are three different things that make up a dataframe: the values that are in the cells, the column names, and the index. The column and index can take on values that are the same as the values in a dataframe; string, int, float, datetime, and more.
It’s pretty obvious what role the columns play: they keep track of the name of different sets of values. But for people who may have seen other dataframe-like libraries, the role played by the index may be less familiar. The easiest way to think about a pandas index is that it does for row values what the column titles do for columnar values: it’s a way of keeping track of what individual roles are and it doesn’t get used for calculations (just as summing a column ignores the name of the row).
Here’s an example to show this. Let’s first create a simple dataframe:
df = pd.DataFrame(
    data={
        "col0": [0, 0, 0, 0],
        "col1": [0, 0, 0, 0],
        "col2": [0, 0, 0, 0],
        "col3": ["a", "b", "b", "a"],
        "col4": ["alpha", "gamma", "gamma", "gamma"],
    },
    index=["row" + str(i) for i in range(4)],
)
df.head()| col0 | col1 | col2 | col3 | col4 | |
|---|---|---|---|---|---|
| row0 | 0 | 0 | 0 | a | alpha |
| row1 | 0 | 0 | 0 | b | gamma |
| row2 | 0 | 0 | 0 | b | gamma |
| row3 | 0 | 0 | 0 | a | gamma |
If we add one to the integer columns in the dataframe, this is what we get (note we’re not saving the result because we don’t have an assignment step with an = sign):
df[["col0", "col1", "col2"]] + 1| col0 | col1 | col2 | |
|---|---|---|---|
| row0 | 1 | 1 | 1 |
| row1 | 1 | 1 | 1 |
| row2 | 1 | 1 | 1 |
| row3 | 1 | 1 | 1 |
Now let’s use col0 as our index instead of the original labels we created and add one to the remaining numeric columns (this time assigning the result back to the original columns):
df = df.set_index("col0")
df[["col1", "col2"]] = df[["col1", "col2"]] + 1
df.head()| col1 | col2 | col3 | col4 | |
|---|---|---|---|---|
| col0 | ||||
| 0 | 1 | 1 | a | alpha |
| 0 | 1 | 1 | b | gamma |
| 0 | 1 | 1 | b | gamma |
| 0 | 1 | 1 | a | gamma |
What was a column name has become an index name (col0, which you can change with df.index.name='newname') and, when we do add one, it isn’t applied to the index values (here, all zeros). Even though their datatype is int, for integer, the index entries are now acting as a label for each row—not as values in the dataframe.
An index can be useful for keeping track of what’s going on, and it’s particularly convenient for some datetime operations.
TipExercise
Working with the dataframe above, add the phrase ” more text” onto the two string columns, col3 and col4. Remember that strings respect the + operator.
Whenever you use groupby() (and some other operations), the columns you use to perform the operation are set as the index of the returned dataframe (you can have multiple index columns). To get back those back to being columns, use the reset_index() method like so:
df.groupby(["col3", "col4"]).sum()| col1 | col2 | ||
|---|---|---|---|
| col3 | col4 | ||
| a | alpha | 1 | 1 |
| gamma | 1 | 1 | |
| b | gamma | 2 | 2 |
df.groupby(["col3", "col4"]).sum().reset_index()| col3 | col4 | col1 | col2 | |
|---|---|---|---|---|
| 0 | a | alpha | 1 | 1 |
| 1 | a | gamma | 1 | 1 |
| 2 | b | gamma | 2 | 2 |
TipExercise
Group the df object above by col1 and col2 using the first aggregation operation in place of sum() above. Reset the index to return col1 and col2 to being regular columns.
Datatypes
Pandas has some built-in datatypes (some are the basic Python datatypes) that will make your life a lot easier if you work with them. Why bother specifying datatypes? Languages like Python let you get away with having pretty much anything in your columns. But this can be a problem: sometimes you’ll end up mixing integers, strings, the generic ‘object’ datatype, and more by mistake. By ensuring that columns conform to a datatype, you can save yourself from some of the trials that come with these mixed datatypes. Some of the most important datatypes for dataframe are string, float, categorical, datetime, int, and boolean.
Typically, you’ll read in a dataset where the datatypes of the columns are a mess. One of the first things you’ll want to do is sort these out. Here’s an example dataset showing how to set the datatypes:
data = [
    ["string1", "string2"],
    [1.2, 3.4],
    ["type_a", "type_b"],
    ["01-01-1999", "01-01-2000"],
    [1, 2],
    [0, 1],
]
columns = [
    "string_col",
    "double_col",
    "category_col",
    "datetime_col",
    "integer_col",
    "bool_col",
]

df = pd.DataFrame(data=np.array(data).T, columns=columns)
df.info()
<class 'pandas.core.frame.DataFrame'>
RangeIndex: 2 entries, 0 to 1
Data columns (total 6 columns):
# Column Non-Null Count Dtype
--- ------ -------------- -----
0 string_col 2 non-null object
1 double_col 2 non-null object
2 category_col 2 non-null object
3 datetime_col 2 non-null object
4 integer_col 2 non-null object
5 bool_col 2 non-null object
dtypes: object(6)
memory usage: 224.0+ bytesNote that the data type for all of these columns is the generic ‘Object’ (you can see this from the Dtype column that is printed when you use df.info()). Let’s fix that:
df = df.assign(
    string_col=df["string_col"].astype("string"),
    double_col=df["double_col"].astype("double"),
    category_col=df["category_col"].astype("category"),
    datetime_col=df["datetime_col"].astype("datetime64[ns]"),
    integer_col=df["integer_col"].astype("int"),
    bool_col=df["bool_col"].astype("bool"),
)
df.info()
<class 'pandas.core.frame.DataFrame'>
RangeIndex: 2 entries, 0 to 1
Data columns (total 6 columns):
# Column Non-Null Count Dtype
--- ------ -------------- -----
0 string_col 2 non-null string
1 double_col 2 non-null float64
2 category_col 2 non-null category
3 datetime_col 2 non-null datetime64[ns]
4 integer_col 2 non-null int64
5 bool_col 2 non-null bool
dtypes: bool(1), category(1), datetime64[ns](1), float64(1), int64(1), string(1)
memory usage: 320.0 bytesOnce you have applied datatypes to the columns in your dataframe, tools like skimpy (install using pip install skimpy on the command line or !pip install skimpy within a Colab code cell if you’re using Google Colab) can then provide richer summaries of your data. (Skimpy will try and infer column data types, but it’s not perfect.)
from skimpy import skim

skim(df)
╭──────────────────────────────────────────────── skimpy summary ─────────────────────────────────────────────────╮ │ Data Summary Data Types Categories │ │ ┏━━━━━━━━━━━━━━━━━━━┳━━━━━━━━┓ ┏━━━━━━━━━━━━━┳━━━━━━━┓ ┏━━━━━━━━━━━━━━━━━━━━━━━┓ │ │ ┃ Dataframe ┃ Values ┃ ┃ Column Type ┃ Count ┃ ┃ Categorical Variables ┃ │ │ ┡━━━━━━━━━━━━━━━━━━━╇━━━━━━━━┩ ┡━━━━━━━━━━━━━╇━━━━━━━┩ ┡━━━━━━━━━━━━━━━━━━━━━━━┩ │ │ │ Number of rows │ 2 │ │ string │ 1 │ │ category_col │ │ │ │ Number of columns │ 6 │ │ float64 │ 1 │ └───────────────────────┘ │ │ └───────────────────┴────────┘ │ category │ 1 │ │ │ │ datetime64 │ 1 │ │ │ │ int64 │ 1 │ │ │ │ bool │ 1 │ │ │ └─────────────┴───────┘ │ │ number │ │ ┏━━━━━━━━━━━━━━━━━━┳━━━━━━┳━━━━━━━━┳━━━━━━━━┳━━━━━━━━━━━┳━━━━━━━┳━━━━━━━━┳━━━━━━━┳━━━━━━━━┳━━━━━━━━┳━━━━━━━━━┓ │ │ ┃ column ┃ NA ┃ NA % ┃ mean ┃ sd ┃ p0 ┃ p25 ┃ p50 ┃ p75 ┃ p100 ┃ hist ┃ │ │ ┡━━━━━━━━━━━━━━━━━━╇━━━━━━╇━━━━━━━━╇━━━━━━━━╇━━━━━━━━━━━╇━━━━━━━╇━━━━━━━━╇━━━━━━━╇━━━━━━━━╇━━━━━━━━╇━━━━━━━━━┩ │ │ │ double_col │ 0 │ 0 │ 2.3 │ 1.556 │ 1.2 │ 1.75 │ 2.3 │ 2.85 │ 3.4 │ █ █ │ │ │ │ integer_col │ 0 │ 0 │ 1.5 │ 0.7071 │ 1 │ 1.25 │ 1.5 │ 1.75 │ 2 │ █ █ │ │ │ └──────────────────┴──────┴────────┴────────┴───────────┴───────┴────────┴───────┴────────┴────────┴─────────┘ │ │ category │ │ ┏━━━━━━━━━━━━━━━━━━━━━━━━━━━━━━━━━━━━┳━━━━━━━━━━━┳━━━━━━━━━━━━━━━┳━━━━━━━━━━━━━━━━━━━━━━━┳━━━━━━━━━━━━━━━━━━━┓ │ │ ┃ column ┃ NA ┃ NA % ┃ ordered ┃ unique ┃ │ │ ┡━━━━━━━━━━━━━━━━━━━━━━━━━━━━━━━━━━━━╇━━━━━━━━━━━╇━━━━━━━━━━━━━━━╇━━━━━━━━━━━━━━━━━━━━━━━╇━━━━━━━━━━━━━━━━━━━┩ │ │ │ category_col │ 0 │ 0 │ False │ 2 │ │ │ └────────────────────────────────────┴───────────┴───────────────┴───────────────────────┴───────────────────┘ │ │ bool │ │ ┏━━━━━━━━━━━━━━━━━━━━━━━━━━━━━━┳━━━━━━━━━━━━━━━━━━┳━━━━━━━━━━━━━━━━━━━━━━━━━━━━━━━━━┳━━━━━━━━━━━━━━━━━━━━━━━━┓ │ │ ┃ column ┃ true ┃ true rate ┃ hist ┃ │ │ ┡━━━━━━━━━━━━━━━━━━━━━━━━━━━━━━╇━━━━━━━━━━━━━━━━━━╇━━━━━━━━━━━━━━━━━━━━━━━━━━━━━━━━━╇━━━━━━━━━━━━━━━━━━━━━━━━┩ │ │ │ bool_col │ 2 │ 1 │ █ │ │ │ └──────────────────────────────┴──────────────────┴─────────────────────────────────┴────────────────────────┘ │ │ datetime │ │ ┏━━━━━━━━━━━━━━━━━━━━━━━━━━━━━━━┳━━━━━━━━━┳━━━━━━━━━━━━━┳━━━━━━━━━━━━━━━━━━━━━━━━━━┳━━━━━━━━━━━━━━━━━━━━━━━━━┓ │ │ ┃ column ┃ NA ┃ NA % ┃ first ┃ last ┃ │ │ ┡━━━━━━━━━━━━━━━━━━━━━━━━━━━━━━━╇━━━━━━━━━╇━━━━━━━━━━━━━╇━━━━━━━━━━━━━━━━━━━━━━━━━━╇━━━━━━━━━━━━━━━━━━━━━━━━━┩ │ │ │ datetime_col │ 0 │ 0 │ 1999-01-01 │ 2000-01-01 │ │ │ └───────────────────────────────┴─────────┴─────────────┴──────────────────────────┴─────────────────────────┘ │ │ string │ │ ┏━━━━━━━━━━━━┳━━━━┳━━━━━━┳━━━━━━━━━━┳━━━━━━━━━┳━━━━━━━━━┳━━━━━━━━━┳━━━━━━━━━━━━━┳━━━━━━━━━━━━━━┳━━━━━━━━━━━━━┓ │ │ ┃ ┃ ┃ ┃ ┃ ┃ ┃ ┃ chars per ┃ words per ┃ ┃ │ │ ┃ column ┃ NA ┃ NA % ┃ shortest ┃ longest ┃ min ┃ max ┃ row ┃ row ┃ total words ┃ │ │ ┡━━━━━━━━━━━━╇━━━━╇━━━━━━╇━━━━━━━━━━╇━━━━━━━━━╇━━━━━━━━━╇━━━━━━━━━╇━━━━━━━━━━━━━╇━━━━━━━━━━━━━━╇━━━━━━━━━━━━━┩ │ │ │ string_col │ 0 │ 0 │ string1 │ string1 │ string1 │ string2 │ 7 │ 1 │ 2 │ │ │ └────────────┴────┴──────┴──────────┴─────────┴─────────┴─────────┴─────────────┴──────────────┴─────────────┘ │ ╰────────────────────────────────────────────────────── End ──────────────────────────────────────────────────────╯
There’s a lot more on exploratory data analysis in the Chapter on Exploratory Data Analysis.
TipExercise
Apply the relevant types to this dataframe:
df = pd.DataFrame(
    data={
        "col0": [0, 0, 0, 0],
        "col1": [0, 0, 0, 0],
        "col2": [0, 0, 0, 0],
        "col3": ["a", "b", "b", "a"],
        "col4": ["alpha", "gamma", "gamma", "gamma"],
    },
    index=["row" + str(i) for i in range(4)],
)
If you’re creating a series or dataframe from scratch, here’s how to start off with these datatypes:
import numpy as np
import pandas as pd

str_s = pd.Series(["string1", "string2"], dtype="string")
float_s = pd.Series([1.2, 3.4], dtype=float)
cat_s = pd.Series(["type_a", "type_b"], dtype="category")
date_s = pd.Series(["01-01-1999", "01-01-2000"], dtype="datetime64[ns]")
int_s = pd.Series([1, 2], dtype="int")
bool_s = pd.Series([True, False], dtype=bool)

df = pd.concat([str_s, float_s, cat_s, date_s, int_s, bool_s], axis=1)
df.info()
<class 'pandas.core.frame.DataFrame'>
RangeIndex: 2 entries, 0 to 1
Data columns (total 6 columns):
# Column Non-Null Count Dtype
--- ------ -------------- -----
0 0 2 non-null string
1 1 2 non-null float64
2 2 2 non-null category
3 3 2 non-null datetime64[ns]
4 4 2 non-null int64
5 5 2 non-null bool
dtypes: bool(1), category(1), datetime64[ns](1), float64(1), int64(1), string(1)
memory usage: 320.0 bytesManipulating Rows in Data Frames
So, you’ve got a dataframe and you’d like to cut it down to only work with some rows or do some operations on specific rows. This section will show you how to do exactly that.
Let’s create some fake data to show how this works.
import numpy as np

df = pd.DataFrame(
    data=np.reshape(range(36), (6, 6)),
    index=["a", "b", "c", "d", "e", "f"],
    columns=["col" + str(i) for i in range(6)],
    dtype=float,
)
df["col6"] = ["apple", "orange", "pineapple", "mango", "kiwi", "lemon"]
df| col0 | col1 | col2 | col3 | col4 | col5 | col6 | |
|---|---|---|---|---|---|---|---|
| a | 0.0 | 1.0 | 2.0 | 3.0 | 4.0 | 5.0 | apple |
| b | 6.0 | 7.0 | 8.0 | 9.0 | 10.0 | 11.0 | orange |
| c | 12.0 | 13.0 | 14.0 | 15.0 | 16.0 | 17.0 | pineapple |
| d | 18.0 | 19.0 | 20.0 | 21.0 | 22.0 | 23.0 | mango |
| e | 24.0 | 25.0 | 26.0 | 27.0 | 28.0 | 29.0 | kiwi |
| f | 30.0 | 31.0 | 32.0 | 33.0 | 34.0 | 35.0 | lemon |
Accessing Rows

To access a particular row directly, you can use df.loc['rowname'] or df.loc[['rowname1', 'rowname1']] for two different rows.
For example,
df.loc[["a", "b"]]| col0 | col1 | col2 | col3 | col4 | col5 | col6 | |
|---|---|---|---|---|---|---|---|
| a | 0.0 | 1.0 | 2.0 | 3.0 | 4.0 | 5.0 | apple |
| b | 6.0 | 7.0 | 8.0 | 9.0 | 10.0 | 11.0 | orange |
But you can also access particular rows based on their location in the dataframe using .iloc. Remember that Python indices begin from zero, so to retrieve the first row you would use .iloc[0]:
df.iloc[0]col0 0.0
col1 1.0
col2 2.0
col3 3.0
col4 4.0
col5 5.0
col6 apple
Name: a, dtype: objectThis works for multiple rows too. Let’s grab the first and third rows (in positions 0 and 2) by passing a list of positions:
df.iloc[[0, 2]]| col0 | col1 | col2 | col3 | col4 | col5 | col6 | |
|---|---|---|---|---|---|---|---|
| a | 0.0 | 1.0 | 2.0 | 3.0 | 4.0 | 5.0 | apple |
| c | 12.0 | 13.0 | 14.0 | 15.0 | 16.0 | 17.0 | pineapple |
There are other ways to access multiple rows that make use of slicing but we’ll leave that topic for another time.
Filtering rows with query()
We can also filter rows based on a condition using query():
df.query("col6 == 'kiwi' or col6 == 'pineapple'")| col0 | col1 | col2 | col3 | col4 | col5 | col6 | |
|---|---|---|---|---|---|---|---|
| c | 12.0 | 13.0 | 14.0 | 15.0 | 16.0 | 17.0 | pineapple |
| e | 24.0 | 25.0 | 26.0 | 27.0 | 28.0 | 29.0 | kiwi |
For numbers, you can also use the greater than and less than signs:
df.query("col0 > 6")| col0 | col1 | col2 | col3 | col4 | col5 | col6 | |
|---|---|---|---|---|---|---|---|
| c | 12.0 | 13.0 | 14.0 | 15.0 | 16.0 | 17.0 | pineapple |
| d | 18.0 | 19.0 | 20.0 | 21.0 | 22.0 | 23.0 | mango |
| e | 24.0 | 25.0 | 26.0 | 27.0 | 28.0 | 29.0 | kiwi |
| f | 30.0 | 31.0 | 32.0 | 33.0 | 34.0 | 35.0 | lemon |
In fact, there are lots of options that work with query(): as well as > (greater than), you can use >= (greater than or equal to), < (less than), <= (less than or equal to), == (equal to), and != (not equal to). You can also use the commands and as well as or to combine multiple conditions. Below is an example of and from the flights dataframe, which we’ll load first (NB this is a big file!):
flights = pd.read_parquet(
    "https://github.com/aeturrell/coding-for-economists/blob/main/data/flights.parquet?raw=true"
)
flights.head()| year | month | day | dep_time | sched_dep_time | dep_delay | arr_time | sched_arr_time | arr_delay | carrier | flight | tailnum | origin | dest | air_time | distance | hour | minute | time_hour | |
|---|---|---|---|---|---|---|---|---|---|---|---|---|---|---|---|---|---|---|---|
| 114018 | 2013 | 2 | 4 | 1032.0 | 924.0 | 68.0 | 1222.0 | 1118 | 64.0 | EV | 4234 | N14148 | EWR | STL | 153.0 | 872 | 9 | 24 | 2013-02-04 14:00:00+00:00 |
| 314547 | 2013 | 9 | 6 | 1900.0 | 1903.0 | -3.0 | 2008.0 | 2034 | -26.0 | EV | 4195 | N14125 | EWR | BNA | 95.0 | 748 | 19 | 3 | 2013-09-06 23:00:00+00:00 |
| 49815 | 2013 | 10 | 25 | 1108.0 | 1115.0 | -7.0 | 1241.0 | 1300 | -19.0 | EV | 5273 | N615QX | LGA | PIT | 55.0 | 335 | 11 | 15 | 2013-10-25 15:00:00+00:00 |
| 40120 | 2013 | 10 | 15 | 709.0 | 710.0 | -1.0 | 826.0 | 845 | -19.0 | AA | 305 | N593AA | LGA | ORD | 109.0 | 733 | 7 | 10 | 2013-10-15 11:00:00+00:00 |
| 37559 | 2013 | 10 | 12 | 758.0 | 800.0 | -2.0 | 1240.0 | 1003 | NaN | 9E | 3353 | N925XJ | JFK | DTW | NaN | 509 | 8 | 0 | 2013-10-12 12:00:00+00:00 |
# Flights that departed on January 1
flights.query("month == 1 and day == 1")| year | month | day | dep_time | sched_dep_time | dep_delay | arr_time | sched_arr_time | arr_delay | carrier | flight | tailnum | origin | dest | air_time | distance | hour | minute | time_hour | |
|---|---|---|---|---|---|---|---|---|---|---|---|---|---|---|---|---|---|---|---|
| 690 | 2013 | 1 | 1 | 1856.0 | 1859.0 | -3.0 | 2133.0 | 2155 | -22.0 | B6 | 155 | N505JB | JFK | MCO | 133.0 | 944 | 18 | 59 | 2013-01-01 23:00:00+00:00 |
| 674 | 2013 | 1 | 1 | 1842.0 | 1829.0 | 13.0 | 2144.0 | 2136 | 8.0 | UA | 1292 | N14214 | EWR | FLL | 149.0 | 1065 | 18 | 29 | 2013-01-01 23:00:00+00:00 |
| 605 | 2013 | 1 | 1 | 1729.0 | 1718.0 | 11.0 | 2052.0 | 2055 | -3.0 | UA | 1284 | N14120 | EWR | SFO | 360.0 | 2565 | 17 | 18 | 2013-01-01 22:00:00+00:00 |
| 660 | 2013 | 1 | 1 | 1826.0 | 1830.0 | -4.0 | 2154.0 | 2207 | -13.0 | DL | 1643 | N3772H | JFK | SEA | 334.0 | 2422 | 18 | 30 | 2013-01-01 23:00:00+00:00 |
| 269 | 2013 | 1 | 1 | 1120.0 | 944.0 | 96.0 | 1331.0 | 1213 | 78.0 | EV | 4495 | N16561 | EWR | SAV | 117.0 | 708 | 9 | 44 | 2013-01-01 14:00:00+00:00 |
| ... | ... | ... | ... | ... | ... | ... | ... | ... | ... | ... | ... | ... | ... | ... | ... | ... | ... | ... | ... |
| 44 | 2013 | 1 | 1 | 639.0 | 640.0 | -1.0 | 739.0 | 749 | -10.0 | B6 | 1002 | N805JB | JFK | BOS | 41.0 | 187 | 6 | 40 | 2013-01-01 11:00:00+00:00 |
| 127 | 2013 | 1 | 1 | 820.0 | 820.0 | 0.0 | 1249.0 | 1329 | -40.0 | DL | 301 | N900PC | JFK | SJU | 182.0 | 1598 | 8 | 20 | 2013-01-01 13:00:00+00:00 |
| 156 | 2013 | 1 | 1 | 852.0 | 855.0 | -3.0 | 1046.0 | 1020 | 26.0 | WN | 3848 | N777QC | EWR | MDW | 146.0 | 711 | 8 | 55 | 2013-01-01 13:00:00+00:00 |
| 32 | 2013 | 1 | 1 | 623.0 | 627.0 | -4.0 | 933.0 | 932 | 1.0 | UA | 496 | N459UA | LGA | IAH | 229.0 | 1416 | 6 | 27 | 2013-01-01 11:00:00+00:00 |
| 595 | 2013 | 1 | 1 | 1717.0 | 1720.0 | -3.0 | 1920.0 | 1910 | 10.0 | AA | 345 | N539AA | LGA | ORD | 141.0 | 733 | 17 | 20 | 2013-01-01 22:00:00+00:00 |
243 rows × 19 columns
Note that equality is tested by == and not by =, because the latter is used for assignment.
query() can also be used to pick out rows based on relationships between columns (we’ll use the penguins dataset to show this).
penguins.query("bill_length_mm<bill_depth_mm*1.8")| species | island | bill_length_mm | bill_depth_mm | flipper_length_mm | body_mass_g | sex | |
|---|---|---|---|---|---|---|---|
| 14 | Adelie | Torgersen | 34.6 | 21.1 | 198.0 | 4400.0 | Male |
| 70 | Adelie | Torgersen | 33.5 | 19.0 | 190.0 | 3600.0 | Female |
Variables not in dataframes can be referenced with an @ character like @a + b.
outside_var = 21
penguins.query("bill_depth_mm > @outside_var")| species | island | bill_length_mm | bill_depth_mm | flipper_length_mm | body_mass_g | sex | |
|---|---|---|---|---|---|---|---|
| 13 | Adelie | Torgersen | 38.6 | 21.2 | 191.0 | 3800.0 | Male |
| 14 | Adelie | Torgersen | 34.6 | 21.1 | 198.0 | 4400.0 | Male |
| 19 | Adelie | Torgersen | 46.0 | 21.5 | 194.0 | 4200.0 | Male |
| 35 | Adelie | Dream | 39.2 | 21.1 | 196.0 | 4150.0 | Male |
| 49 | Adelie | Dream | 42.3 | 21.2 | 191.0 | 4150.0 | Male |
| 61 | Adelie | Biscoe | 41.3 | 21.1 | 195.0 | 4400.0 | Male |
Re-arranging Rows
Again and again, you will want to re-order the rows of your dataframe according to the values in a particular column. pandas makes this very easy via the .sort_values() function. It takes a data frame and a set of column names to sort by. If you provide more than one column name, each additional column will be used to break ties in the values of preceding columns. For example, the following code sorts by the departure time, which is spread over four columns.
flights.sort_values(["year", "month", "day", "dep_time"])| year | month | day | dep_time | sched_dep_time | dep_delay | arr_time | sched_arr_time | arr_delay | carrier | flight | tailnum | origin | dest | air_time | distance | hour | minute | time_hour | |
|---|---|---|---|---|---|---|---|---|---|---|---|---|---|---|---|---|---|---|---|
| 2 | 2013 | 1 | 1 | 542.0 | 540.0 | 2.0 | 923.0 | 850 | 33.0 | AA | 1141 | N619AA | JFK | MIA | 160.0 | 1089 | 5 | 40 | 2013-01-01 10:00:00+00:00 |
| 5 | 2013 | 1 | 1 | 554.0 | 558.0 | -4.0 | 740.0 | 728 | 12.0 | UA | 1696 | N39463 | EWR | ORD | 150.0 | 719 | 5 | 58 | 2013-01-01 10:00:00+00:00 |
| 23 | 2013 | 1 | 1 | 606.0 | 610.0 | -4.0 | 837.0 | 845 | -8.0 | DL | 1743 | N3739P | JFK | ATL | 128.0 | 760 | 6 | 10 | 2013-01-01 11:00:00+00:00 |
| 32 | 2013 | 1 | 1 | 623.0 | 627.0 | -4.0 | 933.0 | 932 | 1.0 | UA | 496 | N459UA | LGA | IAH | 229.0 | 1416 | 6 | 27 | 2013-01-01 11:00:00+00:00 |
| 39 | 2013 | 1 | 1 | 629.0 | 630.0 | -1.0 | 721.0 | 740 | -19.0 | WN | 4646 | N273WN | LGA | BWI | 40.0 | 185 | 6 | 30 | 2013-01-01 11:00:00+00:00 |
| ... | ... | ... | ... | ... | ... | ... | ... | ... | ... | ... | ... | ... | ... | ... | ... | ... | ... | ... | ... |
| 111271 | 2013 | 12 | 31 | 2218.0 | 2219.0 | -1.0 | 315.0 | 304 | 11.0 | B6 | 1203 | N625JB | JFK | SJU | 202.0 | 1598 | 22 | 19 | 2014-01-01 03:00:00+00:00 |
| 111273 | 2013 | 12 | 31 | 2245.0 | 2250.0 | -5.0 | 2359.0 | 2356 | 3.0 | B6 | 1816 | N318JB | JFK | SYR | 51.0 | 209 | 22 | 50 | 2014-01-01 03:00:00+00:00 |
| 111291 | 2013 | 12 | 31 | NaN | 705.0 | NaN | NaN | 931 | NaN | UA | 1729 | NaN | EWR | DEN | NaN | 1605 | 7 | 5 | 2013-12-31 12:00:00+00:00 |
| 111286 | 2013 | 12 | 31 | NaN | 754.0 | NaN | NaN | 1118 | NaN | UA | 1455 | NaN | EWR | LAX | NaN | 2454 | 7 | 54 | 2013-12-31 12:00:00+00:00 |
| 111292 | 2013 | 12 | 31 | NaN | 825.0 | NaN | NaN | 1029 | NaN | US | 1831 | NaN | JFK | CLT | NaN | 541 | 8 | 25 | 2013-12-31 13:00:00+00:00 |
100000 rows × 19 columns
You can use the keyword argument ascending=False to re-order by a column or columns in descending order. For example, this code shows the most delayed flights:
flights.sort_values("dep_delay", ascending=False)| year | month | day | dep_time | sched_dep_time | dep_delay | arr_time | sched_arr_time | arr_delay | carrier | flight | tailnum | origin | dest | air_time | distance | hour | minute | time_hour | |
|---|---|---|---|---|---|---|---|---|---|---|---|---|---|---|---|---|---|---|---|
| 8239 | 2013 | 1 | 10 | 1121.0 | 1635.0 | 1126.0 | 1239.0 | 1810 | 1109.0 | MQ | 3695 | N517MQ | EWR | ORD | 111.0 | 719 | 16 | 35 | 2013-01-10 21:00:00+00:00 |
| 247040 | 2013 | 6 | 27 | 959.0 | 1900.0 | 899.0 | 1236.0 | 2226 | 850.0 | DL | 2007 | N3762Y | JFK | PDX | 313.0 | 2454 | 19 | 0 | 2013-06-27 23:00:00+00:00 |
| 270987 | 2013 | 7 | 22 | 2257.0 | 759.0 | 898.0 | 121.0 | 1026 | 895.0 | DL | 2047 | N6716C | LGA | ATL | 109.0 | 762 | 7 | 59 | 2013-07-22 11:00:00+00:00 |
| 195711 | 2013 | 5 | 3 | 1133.0 | 2055.0 | 878.0 | 1250.0 | 2215 | 875.0 | MQ | 3744 | N523MQ | EWR | ORD | 112.0 | 719 | 20 | 55 | 2013-05-04 00:00:00+00:00 |
| 119784 | 2013 | 2 | 10 | 2243.0 | 830.0 | 853.0 | 100.0 | 1106 | 834.0 | F9 | 835 | N203FR | LGA | DEN | 233.0 | 1620 | 8 | 30 | 2013-02-10 13:00:00+00:00 |
| ... | ... | ... | ... | ... | ... | ... | ... | ... | ... | ... | ... | ... | ... | ... | ... | ... | ... | ... | ... |
| 174576 | 2013 | 4 | 10 | NaN | 1935.0 | NaN | NaN | 2113 | NaN | 9E | 4127 | NaN | JFK | IAD | NaN | 228 | 19 | 35 | 2013-04-10 23:00:00+00:00 |
| 152951 | 2013 | 3 | 18 | NaN | 2000.0 | NaN | NaN | 2243 | NaN | DL | 1147 | N648DL | LGA | ATL | NaN | 762 | 20 | 0 | 2013-03-19 00:00:00+00:00 |
| 238050 | 2013 | 6 | 17 | NaN | 709.0 | NaN | NaN | 942 | NaN | UA | 318 | NaN | LGA | IAH | NaN | 1416 | 7 | 9 | 2013-06-17 11:00:00+00:00 |
| 25985 | 2013 | 1 | 30 | NaN | 1555.0 | NaN | NaN | 1810 | NaN | EV | 3820 | N12563 | EWR | SDF | NaN | 642 | 15 | 55 | 2013-01-30 20:00:00+00:00 |
| 223861 | 2013 | 6 | 2 | NaN | 1500.0 | NaN | NaN | 1722 | NaN | EV | 4971 | N600QX | LGA | CHS | NaN | 641 | 15 | 0 | 2013-06-02 19:00:00+00:00 |
100000 rows × 19 columns
You can of course combine all of the above row manipulations to solve more complex problems. For example, we could look for the top three destinations of the flights that were most delayed on arrival that left on roughly on time:
(
    flights.query("dep_delay <= 10 and dep_delay >= -10")
    .sort_values("arr_delay", ascending=False)
    .iloc[[0, 1, 2]]
)| year | month | day | dep_time | sched_dep_time | dep_delay | arr_time | sched_arr_time | arr_delay | carrier | flight | tailnum | origin | dest | air_time | distance | hour | minute | time_hour | |
|---|---|---|---|---|---|---|---|---|---|---|---|---|---|---|---|---|---|---|---|
| 55985 | 2013 | 11 | 1 | 658.0 | 700.0 | -2.0 | 1329.0 | 1015 | 194.0 | VX | 399 | N629VA | JFK | LAX | 336.0 | 2475 | 7 | 0 | 2013-11-01 11:00:00+00:00 |
| 181270 | 2013 | 4 | 18 | 558.0 | 600.0 | -2.0 | 1149.0 | 850 | 179.0 | AA | 707 | N3EXAA | LGA | DFW | 234.0 | 1389 | 6 | 0 | 2013-04-18 10:00:00+00:00 |
| 256340 | 2013 | 7 | 7 | 1659.0 | 1700.0 | -1.0 | 2050.0 | 1823 | 147.0 | US | 2183 | N948UW | LGA | DCA | 64.0 | 214 | 17 | 0 | 2013-07-07 21:00:00+00:00 |
Exercises
Find all flights that
Had an arrival delay of two or more hours
Flew to Houston (
"IAH"or"HOU")Were operated by United, American, or Delta
Departed in summer (July, August, and September)
Arrived more than two hours late, but didn’t leave late
Were delayed by at least an hour, but made up over 30 minutes in flight
Sort
flightsto find the flights with longest departure delays.Sort
flightsto find the fastest flightsWhich flights traveled the farthest?
Does it matter what order you used
query()andsort_values()in if you’re using both? Why/why not? Think about the results and how much work the functions would have to do.
Manipulating Columns
Now you know how to put data in a dataframe, how do you access the bits of it you need? There are various ways and in this section, we’ll look at ways to access columns and perform operations on them.

Note
Some pandas operations can apply either to columns or rows, depending on the syntax used. For example, accessing values by position can be achieved in the same way for rows and columns via .iloc where to access the ith row you would use df.iloc[i] and to access the jth column you would use df.iloc[:, j] where : stands in for ‘any row’.
Creating New Columns
Columns and rows in dataframes can undergo all the usual arithmetic operations you’d expect of addition, multiplication, division, and so on. If the underlying datatypes of two columns have a group operation, then the dataframe columns will use that.

Let’s now move on to creating new columns, either using new information or from existing columns. Given a dataframe, df, creating a new column with the same value repeated is as easy as using square brackets with a string (text enclosed by quotation marks) in.
df["new_column0"] = 5
df| col0 | col1 | col2 | col3 | col4 | col5 | col6 | new_column0 | |
|---|---|---|---|---|---|---|---|---|
| a | 0.0 | 1.0 | 2.0 | 3.0 | 4.0 | 5.0 | apple | 5 |
| b | 6.0 | 7.0 | 8.0 | 9.0 | 10.0 | 11.0 | orange | 5 |
| c | 12.0 | 13.0 | 14.0 | 15.0 | 16.0 | 17.0 | pineapple | 5 |
| d | 18.0 | 19.0 | 20.0 | 21.0 | 22.0 | 23.0 | mango | 5 |
| e | 24.0 | 25.0 | 26.0 | 27.0 | 28.0 | 29.0 | kiwi | 5 |
| f | 30.0 | 31.0 | 32.0 | 33.0 | 34.0 | 35.0 | lemon | 5 |
If we do the same operation again, but with a different right-hand side, it will overwrite what was already in that column. Let’s see this with an example where we put different values in each position by assigning a list to the new column.
df["new_column0"] = [0, 1, 2, 3, 4, 5]
df| col0 | col1 | col2 | col3 | col4 | col5 | col6 | new_column0 | |
|---|---|---|---|---|---|---|---|---|
| a | 0.0 | 1.0 | 2.0 | 3.0 | 4.0 | 5.0 | apple | 0 |
| b | 6.0 | 7.0 | 8.0 | 9.0 | 10.0 | 11.0 | orange | 1 |
| c | 12.0 | 13.0 | 14.0 | 15.0 | 16.0 | 17.0 | pineapple | 2 |
| d | 18.0 | 19.0 | 20.0 | 21.0 | 22.0 | 23.0 | mango | 3 |
| e | 24.0 | 25.0 | 26.0 | 27.0 | 28.0 | 29.0 | kiwi | 4 |
| f | 30.0 | 31.0 | 32.0 | 33.0 | 34.0 | 35.0 | lemon | 5 |
TipExercise
What happens if you try to use assignment where the right-hand side values are longer or shorter than the length of the data frame?
By passing a list within the square brackets, we can actually create more than one new column:
df[["new_column1", "new_column2"]] = [5, 6]
df| col0 | col1 | col2 | col3 | col4 | col5 | col6 | new_column0 | new_column1 | new_column2 | |
|---|---|---|---|---|---|---|---|---|---|---|
| a | 0.0 | 1.0 | 2.0 | 3.0 | 4.0 | 5.0 | apple | 0 | 5 | 6 |
| b | 6.0 | 7.0 | 8.0 | 9.0 | 10.0 | 11.0 | orange | 1 | 5 | 6 |
| c | 12.0 | 13.0 | 14.0 | 15.0 | 16.0 | 17.0 | pineapple | 2 | 5 | 6 |
| d | 18.0 | 19.0 | 20.0 | 21.0 | 22.0 | 23.0 | mango | 3 | 5 | 6 |
| e | 24.0 | 25.0 | 26.0 | 27.0 | 28.0 | 29.0 | kiwi | 4 | 5 | 6 |
| f | 30.0 | 31.0 | 32.0 | 33.0 | 34.0 | 35.0 | lemon | 5 | 5 | 6 |
Very often, you will want to create a new column that is the result of an operation on existing columns. There are a couple of ways to do this. The ‘stand-alone’ method works in a similar way to what we’ve just seen except that we refer to the dataframe on the right-hand side of the assignment statement too:
df["new_column3"] = df["col0"] - df["new_column0"]
df| col0 | col1 | col2 | col3 | col4 | col5 | col6 | new_column0 | new_column1 | new_column2 | new_column3 | |
|---|---|---|---|---|---|---|---|---|---|---|---|
| a | 0.0 | 1.0 | 2.0 | 3.0 | 4.0 | 5.0 | apple | 0 | 5 | 6 | 0.0 |
| b | 6.0 | 7.0 | 8.0 | 9.0 | 10.0 | 11.0 | orange | 1 | 5 | 6 | 5.0 |
| c | 12.0 | 13.0 | 14.0 | 15.0 | 16.0 | 17.0 | pineapple | 2 | 5 | 6 | 10.0 |
| d | 18.0 | 19.0 | 20.0 | 21.0 | 22.0 | 23.0 | mango | 3 | 5 | 6 | 15.0 |
| e | 24.0 | 25.0 | 26.0 | 27.0 | 28.0 | 29.0 | kiwi | 4 | 5 | 6 | 20.0 |
| f | 30.0 | 31.0 | 32.0 | 33.0 | 34.0 | 35.0 | lemon | 5 | 5 | 6 | 25.0 |
Assign
The other way to do this involves an ‘assign’ statement and is used when you wish to chain multiple steps together. These use a special syntax called a ‘lambda’ statement, which (here at least) just provides a way of specifying to pandas that we wish to perform the operation on every row. Below is an example using the flights data. You should note though that the word ‘row’ below is a dummy; you could replace it with any variable name (for example, x) but row makes what is happening a little bit clearer.
(
    flights.assign(
        gain=lambda row: row["dep_delay"] - row["arr_delay"],
        speed=lambda row: row["distance"] / row["air_time"] * 60,
    )
)| year | month | day | dep_time | sched_dep_time | dep_delay | arr_time | sched_arr_time | arr_delay | carrier | ... | tailnum | origin | dest | air_time | distance | hour | minute | time_hour | gain | speed | |
|---|---|---|---|---|---|---|---|---|---|---|---|---|---|---|---|---|---|---|---|---|---|
| 114018 | 2013 | 2 | 4 | 1032.0 | 924.0 | 68.0 | 1222.0 | 1118 | 64.0 | EV | ... | N14148 | EWR | STL | 153.0 | 872 | 9 | 24 | 2013-02-04 14:00:00+00:00 | 4.0 | 341.960784 |
| 314547 | 2013 | 9 | 6 | 1900.0 | 1903.0 | -3.0 | 2008.0 | 2034 | -26.0 | EV | ... | N14125 | EWR | BNA | 95.0 | 748 | 19 | 3 | 2013-09-06 23:00:00+00:00 | 23.0 | 472.421053 |
| 49815 | 2013 | 10 | 25 | 1108.0 | 1115.0 | -7.0 | 1241.0 | 1300 | -19.0 | EV | ... | N615QX | LGA | PIT | 55.0 | 335 | 11 | 15 | 2013-10-25 15:00:00+00:00 | 12.0 | 365.454545 |
| 40120 | 2013 | 10 | 15 | 709.0 | 710.0 | -1.0 | 826.0 | 845 | -19.0 | AA | ... | N593AA | LGA | ORD | 109.0 | 733 | 7 | 10 | 2013-10-15 11:00:00+00:00 | 18.0 | 403.486239 |
| 37559 | 2013 | 10 | 12 | 758.0 | 800.0 | -2.0 | 1240.0 | 1003 | NaN | 9E | ... | N925XJ | JFK | DTW | NaN | 509 | 8 | 0 | 2013-10-12 12:00:00+00:00 | NaN | NaN |
| ... | ... | ... | ... | ... | ... | ... | ... | ... | ... | ... | ... | ... | ... | ... | ... | ... | ... | ... | ... | ... | ... |
| 276666 | 2013 | 7 | 28 | 1949.0 | 1722.0 | 147.0 | 2137.0 | 1847 | 170.0 | EV | ... | N29917 | EWR | BNA | 116.0 | 748 | 17 | 22 | 2013-07-28 21:00:00+00:00 | -23.0 | 386.896552 |
| 25985 | 2013 | 1 | 30 | NaN | 1555.0 | NaN | NaN | 1810 | NaN | EV | ... | N12563 | EWR | SDF | NaN | 642 | 15 | 55 | 2013-01-30 20:00:00+00:00 | NaN | NaN |
| 223861 | 2013 | 6 | 2 | NaN | 1500.0 | NaN | NaN | 1722 | NaN | EV | ... | N600QX | LGA | CHS | NaN | 641 | 15 | 0 | 2013-06-02 19:00:00+00:00 | NaN | NaN |
| 42138 | 2013 | 10 | 17 | 821.0 | 825.0 | -4.0 | 1136.0 | 1148 | -12.0 | UA | ... | N554UA | JFK | SFO | 336.0 | 2586 | 8 | 25 | 2013-10-17 12:00:00+00:00 | 8.0 | 461.785714 |
| 50760 | 2013 | 10 | 26 | 1215.0 | 1200.0 | 15.0 | 1325.0 | 1312 | 13.0 | DL | ... | N648DL | JFK | BOS | 40.0 | 187 | 12 | 0 | 2013-10-26 16:00:00+00:00 | 2.0 | 280.500000 |
100000 rows × 21 columns
You’ll have seen there’s a lambda keyword in the above. Lambda (or anonymous) functions have a rich history in mathematics, and were used by scientists such as Church and Turing to create proofs about what is computable before electronic computers existed.
Note
A lambda function is like any normal function in Python except that it has no name, and it tends to be contained in one line of code. A lambda function is made of an argument, a colon, and an expression, like the following lambda function that multiplies an input by three.
lambda x: x*3They can be used to define compact functions, for example:
multiply_plus_one = lambda x, y: x * y + 1
multiply_plus_one(3, 4)13The main way that you’ll use them is in pandas dataframes.
Accessing Columns
Just as with selecting rows, there are many options and ways to select the columns to operate on. The one with the simplest syntax is the name of the data frame followed by square brackets and the column name (as a string)
df["col0"]a 0.0
b 6.0
c 12.0
d 18.0
e 24.0
f 30.0
Name: col0, dtype: float64If you need to select multiple columns, you cannot just pass a string into df[...]; instead you need to pass an object that is iterable (and so has multiple items). The most straight forward way to select multiple columns is to pass a list. Remember, lists comes in square brackets so we’re going to see something with repeated square brackets: one for accessing the data frame’s innards and one for the list.
df[["col0", "new_column0", "col2"]]| col0 | new_column0 | col2 | |
|---|---|---|---|
| a | 0.0 | 0 | 2.0 |
| b | 6.0 | 1 | 8.0 |
| c | 12.0 | 2 | 14.0 |
| d | 18.0 | 3 | 20.0 |
| e | 24.0 | 4 | 26.0 |
| f | 30.0 | 5 | 32.0 |
If you want to access particular rows at the same time, use the .loc access function:
df.loc[["a", "b"], ["col0", "new_column0", "col2"]]| col0 | new_column0 | col2 | |
|---|---|---|---|
| a | 0.0 | 0 | 2.0 |
| b | 6.0 | 1 | 8.0 |
And, just as with rows, we can access columns by their position using .iloc (where : stands in for ‘any row’).
df.iloc[:, [0, 1]]| col0 | col1 | |
|---|---|---|
| a | 0.0 | 1.0 |
| b | 6.0 | 7.0 |
| c | 12.0 | 13.0 |
| d | 18.0 | 19.0 |
| e | 24.0 | 25.0 |
| f | 30.0 | 31.0 |
Sometimes, you’ll want to select columns based on the type of data that they hold. For this, pandas provides a function .select_dtypes(). Let’s use this to select all columns with integers in the flights data.
flights.select_dtypes("int")| year | month | day | sched_arr_time | flight | distance | hour | minute | |
|---|---|---|---|---|---|---|---|---|
| 114018 | 2013 | 2 | 4 | 1118 | 4234 | 872 | 9 | 24 |
| 314547 | 2013 | 9 | 6 | 2034 | 4195 | 748 | 19 | 3 |
| 49815 | 2013 | 10 | 25 | 1300 | 5273 | 335 | 11 | 15 |
| 40120 | 2013 | 10 | 15 | 845 | 305 | 733 | 7 | 10 |
| 37559 | 2013 | 10 | 12 | 1003 | 3353 | 509 | 8 | 0 |
| ... | ... | ... | ... | ... | ... | ... | ... | ... |
| 276666 | 2013 | 7 | 28 | 1847 | 4187 | 748 | 17 | 22 |
| 25985 | 2013 | 1 | 30 | 1810 | 3820 | 642 | 15 | 55 |
| 223861 | 2013 | 6 | 2 | 1722 | 4971 | 641 | 15 | 0 |
| 42138 | 2013 | 10 | 17 | 1148 | 397 | 2586 | 8 | 25 |
| 50760 | 2013 | 10 | 26 | 1312 | 2451 | 187 | 12 | 0 |
100000 rows × 8 columns
There are other occassions when you’d like to select columns based on criteria such as patterns in the name of the column. Because Python has very good support for text, this is very possible but doesn’t tend to be so built-in to pandas functions. The trick is to generate a list of column names that you want from the pattern you’re interested in.
Let’s see a couple of examples. First, let’s get all columns in our df data frame that begin with "new_...". We’ll generate a list of true and false values reflecting if each of the columns begins with “new” and then we’ll pass those true and false values to .loc, which will only give columns for which the result was True. To show what’s going on, we’ll break it into two steps:
print("The list of columns:")
print(df.columns)
print("\n")

print("The list of true and false values:")
print(df.columns.str.startswith("new"))
print("\n")

print("The selection from the data frame:")
df.loc[:, df.columns.str.startswith("new")]
The list of columns:
Index(['col0', 'col1', 'col2', 'col3', 'col4', 'col5', 'col6', 'new_column0',
'new_column1', 'new_column2', 'new_column3'],
dtype='object')
The list of true and false values:
[False False False False False False False True True True True]
The selection from the data frame:| new_column0 | new_column1 | new_column2 | new_column3 | |
|---|---|---|---|---|
| a | 0 | 5 | 6 | 0.0 |
| b | 1 | 5 | 6 | 5.0 |
| c | 2 | 5 | 6 | 10.0 |
| d | 3 | 5 | 6 | 15.0 |
| e | 4 | 5 | 6 | 20.0 |
| f | 5 | 5 | 6 | 25.0 |
As well as startswith(), there are other commands like endswith(), contains(), isnumeric(), and islower().
Eval
eval() evaluates a string describing operations on DataFrame columns to create new columns. It operates on columns only, not rows or elements. Let’s see an example of it applied to the penguins dataset.
penguins.eval("bill_length_mm / bill_depth_mm").head()0 2.090909
1 2.270115
2 2.238889
3 NaN
4 1.901554
dtype: float64eval is especially useful for filtering by multiple columns at once. In the example below, eval is first used to create a new boolean series (but does not add it to the dataframe) and it is this boolean series that then filters the dataframe down to a small number of rows:
eval_string = "species == 'Gentoo' & island == 'Biscoe' & sex == 'Female'"
penguins.loc[penguins.eval(eval_string), :].head()| species | island | bill_length_mm | bill_depth_mm | flipper_length_mm | body_mass_g | sex | |
|---|---|---|---|---|---|---|---|
| 220 | Gentoo | Biscoe | 46.1 | 13.2 | 211.0 | 4500.0 | Female |
| 222 | Gentoo | Biscoe | 48.7 | 14.1 | 210.0 | 4450.0 | Female |
| 225 | Gentoo | Biscoe | 46.5 | 13.5 | 210.0 | 4550.0 | Female |
| 226 | Gentoo | Biscoe | 45.4 | 14.6 | 211.0 | 4800.0 | Female |
| 228 | Gentoo | Biscoe | 43.3 | 13.4 | 209.0 | 4400.0 | Female |
Renaming Columns
There are three easy ways to rename columns, depending on what the context is. The first is to use the dedicated rename() function with an object called a dictionary. Dictionaries in Python consist of curly brackets with comma separated pairs of values where the first values maps into the second value. An example of a dictionary would be {'old_col1': 'new_col1', 'old_col2': 'new_col2'}. Let’s see this in practice (but note that we are not ‘saving’ the resulting data frame, just showing it—to save it, you’d need to add df = to the left-hand side of the code below).
df.rename(columns={"col3": "letters", "col4": "names", "col6": "fruit"})| col0 | col1 | col2 | letters | names | col5 | fruit | new_column0 | new_column1 | new_column2 | new_column3 | |
|---|---|---|---|---|---|---|---|---|---|---|---|
| a | 0.0 | 1.0 | 2.0 | 3.0 | 4.0 | 5.0 | apple | 0 | 5 | 6 | 0.0 |
| b | 6.0 | 7.0 | 8.0 | 9.0 | 10.0 | 11.0 | orange | 1 | 5 | 6 | 5.0 |
| c | 12.0 | 13.0 | 14.0 | 15.0 | 16.0 | 17.0 | pineapple | 2 | 5 | 6 | 10.0 |
| d | 18.0 | 19.0 | 20.0 | 21.0 | 22.0 | 23.0 | mango | 3 | 5 | 6 | 15.0 |
| e | 24.0 | 25.0 | 26.0 | 27.0 | 28.0 | 29.0 | kiwi | 4 | 5 | 6 | 20.0 |
| f | 30.0 | 31.0 | 32.0 | 33.0 | 34.0 | 35.0 | lemon | 5 | 5 | 6 | 25.0 |
The second method is for when you want to rename all of the columns. For that you simply set df.columns equal to the new set of columns that you’d like to have. For example, we might want to capitalise the first letter of each column using str.capitalize() and assign that to df.columns.
df.columns = df.columns.str.capitalize()
df| Col0 | Col1 | Col2 | Col3 | Col4 | Col5 | Col6 | New_column0 | New_column1 | New_column2 | New_column3 | |
|---|---|---|---|---|---|---|---|---|---|---|---|
| a | 0.0 | 1.0 | 2.0 | 3.0 | 4.0 | 5.0 | apple | 0 | 5 | 6 | 0.0 |
| b | 6.0 | 7.0 | 8.0 | 9.0 | 10.0 | 11.0 | orange | 1 | 5 | 6 | 5.0 |
| c | 12.0 | 13.0 | 14.0 | 15.0 | 16.0 | 17.0 | pineapple | 2 | 5 | 6 | 10.0 |
| d | 18.0 | 19.0 | 20.0 | 21.0 | 22.0 | 23.0 | mango | 3 | 5 | 6 | 15.0 |
| e | 24.0 | 25.0 | 26.0 | 27.0 | 28.0 | 29.0 | kiwi | 4 | 5 | 6 | 20.0 |
| f | 30.0 | 31.0 | 32.0 | 33.0 | 34.0 | 35.0 | lemon | 5 | 5 | 6 | 25.0 |
Finally, we might be interested in just replacing specific parts of column names. In this case, we can use .str.replace(). As an example, let’s add the word "Original" ahead of the original columns:
df.columns.str.replace("Col", "Original_column")Index(['Original_column0', 'Original_column1', 'Original_column2',
'Original_column3', 'Original_column4', 'Original_column5',
'Original_column6', 'New_column0', 'New_column1', 'New_column2',
'New_column3'],
dtype='object')Re-ordering Columns
By default, new columns are added to the right-hand side of the data frame. But you may have reasons to want the columns to appear in a particular order, or perhaps you’d just find it more convenient to have new columns on the left-hand side when there are many columns in a data frame (which happens a lot).
The simplest way to re-order (all) columns is to create a new list of their names with them in the order that you’d like them: but be careful you don’t forget any columns that you’d like to keep!
Let’s see an example with a fresh version of the fake data from earlier. We’ll put all of the odd-numbered columns first, in descending order, then the even similarly.
df = pd.DataFrame(
    data=np.reshape(range(36), (6, 6)),
    index=["a", "b", "c", "d", "e", "f"],
    columns=["col" + str(i) for i in range(6)],
    dtype=float,
)
df| col0 | col1 | col2 | col3 | col4 | col5 | |
|---|---|---|---|---|---|---|
| a | 0.0 | 1.0 | 2.0 | 3.0 | 4.0 | 5.0 |
| b | 6.0 | 7.0 | 8.0 | 9.0 | 10.0 | 11.0 |
| c | 12.0 | 13.0 | 14.0 | 15.0 | 16.0 | 17.0 |
| d | 18.0 | 19.0 | 20.0 | 21.0 | 22.0 | 23.0 |
| e | 24.0 | 25.0 | 26.0 | 27.0 | 28.0 | 29.0 |
| f | 30.0 | 31.0 | 32.0 | 33.0 | 34.0 | 35.0 |
df = df[["col5", "col3", "col1", "col4", "col2", "col0"]]
df| col5 | col3 | col1 | col4 | col2 | col0 | |
|---|---|---|---|---|---|---|
| a | 5.0 | 3.0 | 1.0 | 4.0 | 2.0 | 0.0 |
| b | 11.0 | 9.0 | 7.0 | 10.0 | 8.0 | 6.0 |
| c | 17.0 | 15.0 | 13.0 | 16.0 | 14.0 | 12.0 |
| d | 23.0 | 21.0 | 19.0 | 22.0 | 20.0 | 18.0 |
| e | 29.0 | 27.0 | 25.0 | 28.0 | 26.0 | 24.0 |
| f | 35.0 | 33.0 | 31.0 | 34.0 | 32.0 | 30.0 |
Of course, this is quite tedious if you have lots of columns! There are methods that can help make this easier depending on your context. Perhaps you’d just liked to sort the columns in order? This can be achieved by combining sorted() and the reindex() command (which works for rows or columns) with axis=1, which means the second axis ie columns.
df.reindex(sorted(df.columns), axis=1)| col0 | col1 | col2 | col3 | col4 | col5 | |
|---|---|---|---|---|---|---|
| a | 0.0 | 1.0 | 2.0 | 3.0 | 4.0 | 5.0 |
| b | 6.0 | 7.0 | 8.0 | 9.0 | 10.0 | 11.0 |
| c | 12.0 | 13.0 | 14.0 | 15.0 | 16.0 | 17.0 |
| d | 18.0 | 19.0 | 20.0 | 21.0 | 22.0 | 23.0 |
| e | 24.0 | 25.0 | 26.0 | 27.0 | 28.0 | 29.0 |
| f | 30.0 | 31.0 | 32.0 | 33.0 | 34.0 | 35.0 |
Review of How to Access Rows, Columns, and Values
With all of these different ways to access values in data frames, it can get confusing. These are the different ways to get the first column of a dataframe (when that first column is called column and the dataframe is df):
df.columndf["column"]df.loc[:, "column"]df.iloc[:, 0]
Note that : means ‘give me everything’! The ways to access rows are similar (here assuming the first row is called row):
df.loc["row", :]df.iloc[0, :]
And to access the first value (ie the value in first row, first column):
df.column[0]df["column"][0]df.iloc[0, 0]df.loc["row", "column"]
In the above examples, square brackets are instructions about where to grab bits from the data frame. They are a bit like an address system for values within a dataframe. Square brackets also denote lists though. So if you want to select multiple columns or rows, you might see syntax like this:
df.loc[["row0", "row1"], ["column0", "column2"]]
which picks out two rows and two columns via the lists ["row0", "row1"] and ["column0", "column2"]. Because there are lists alongside the usual system of selecting values, there are two sets of square brackets.
TipTip
:class: tip
If you only want to remember one syntax for accessing rows and columns by name, use the pattern df.loc[["row0", "row1", ...], ["col0", "col1", ...]]. This also works with a single row or a single column (or both).
If you only want to remember one syntax for accessing rows and columns by position, use the pattern df.iloc[[0, 1, ...], [0, 1, ...]]. This also works with a single row or a single column (or both).
Slicing
So often, what we really want is a subset of values (as opposed to all values or just one value). This is where slicing comes in. If you’ve looked at the Chapter on Coding Basics, you’ll know a bit about slicing and indexing already, but we’ll cover the basics here too.
The syntax for slicing is similar to what we’ve seen already: there are two methods .loc to access items by name, and .iloc to access them by position. The syntax for the former is df.loc[start:stop:step, start:stop:step], where the first position is index name and the second is column name (and the same applies for numbers and df.iloc). Let’s see some examples.
df.loc["a":"f":2, "col1":"col3"]| a |
|---|
| c |
| e |
As you can see, slicing even works on names! By asking for rows 'a':'f':2, we get every other row from ‘a’ to ‘f’ (inclusive). Likewise, for columns, we asked for every column between col1 and col3 (inclusive). iloc works in a very similar way.
df.iloc[1:, :-1]| col5 | col3 | col1 | col4 | col2 | |
|---|---|---|---|---|---|
| b | 11.0 | 9.0 | 7.0 | 10.0 | 8.0 |
| c | 17.0 | 15.0 | 13.0 | 16.0 | 14.0 |
| d | 23.0 | 21.0 | 19.0 | 22.0 | 20.0 |
| e | 29.0 | 27.0 | 25.0 | 28.0 | 26.0 |
| f | 35.0 | 33.0 | 31.0 | 34.0 | 32.0 |
In this case, we asked for everything from row 1 onwards, and everything up to (but excluding) the last column.
TipExercise
Access every other column between columns 1 and 5, and rows a to c using the .loc syntax.
Access the same columns and rows using the .iloc syntax.
It’s not just strings and positions that can be sliced though, here’s an example using dates (pandas support for dates is truly excellent):
index = pd.date_range("1/1/2000", periods=12, freq="QE")
df = pd.DataFrame(np.random.randint(0, 10, (12, 5)), index=index, columns=list("ABCDE"))
df| A | B | C | D | E | |
|---|---|---|---|---|---|
| 2000-03-31 | 0 | 8 | 3 | 2 | 1 |
| 2000-06-30 | 3 | 1 | 3 | 5 | 8 |
| 2000-09-30 | 8 | 5 | 7 | 4 | 8 |
| 2000-12-31 | 7 | 9 | 7 | 3 | 0 |
| 2001-03-31 | 7 | 0 | 8 | 3 | 2 |
| 2001-06-30 | 9 | 4 | 7 | 7 | 0 |
| 2001-09-30 | 7 | 2 | 7 | 3 | 3 |
| 2001-12-31 | 6 | 6 | 1 | 8 | 1 |
| 2002-03-31 | 8 | 6 | 1 | 1 | 2 |
| 2002-06-30 | 9 | 1 | 0 | 2 | 1 |
| 2002-09-30 | 1 | 0 | 6 | 7 | 7 |
| 2002-12-31 | 1 | 9 | 7 | 0 | 5 |
Now let’s do some slicing!
df.loc["2000-01-01":"2002-01-01", :]| A | B | C | D | E | |
|---|---|---|---|---|---|
| 2000-03-31 | 0 | 8 | 3 | 2 | 1 |
| 2000-06-30 | 3 | 1 | 3 | 5 | 8 |
| 2000-09-30 | 8 | 5 | 7 | 4 | 8 |
| 2000-12-31 | 7 | 9 | 7 | 3 | 0 |
| 2001-03-31 | 7 | 0 | 8 | 3 | 2 |
| 2001-06-30 | 9 | 4 | 7 | 7 | 0 |
| 2001-09-30 | 7 | 2 | 7 | 3 | 3 |
| 2001-12-31 | 6 | 6 | 1 | 8 | 1 |
Two important points to note here: first, pandas doesn’t mind that we supplied a date that didn’t actually exist in the index. It worked out that by ‘2000-01-01’ we meant a datetime and compared the values of the index to that datetime in order to decide what rows to return from the dataframe. The second thing to notice is the use of : for the column names; this explicitly says ‘give me all the columns’.
Operations on Rows, Columns, and DataFrames
Operations that can apply() to both rows and columns
One of pandas features is that it is happy for you to do operations on either rows or columns by changing a single keyword argument via the apply() method. Both regular functions and lambda functions can be used with the more general apply method, which takes a function and applies it to a given axis (axis=0 or axis="rows" for rows, axis=1 or axis="columns" for columns). Let’s generate some data to demonstrate this:
df = pd.DataFrame(np.random.randint(0, 5, (3, 5)), columns=list("ABCDE"))
df| A | B | C | D | E | |
|---|---|---|---|---|---|
| 0 | 1 | 4 | 4 | 1 | 2 |
| 1 | 4 | 0 | 4 | 2 | 2 |
| 2 | 2 | 1 | 2 | 3 | 0 |
df["A_times_B"] = df.apply(lambda x: x["A"] * x["B"], axis=1)
df| A | B | C | D | E | A_times_B | |
|---|---|---|---|---|---|---|
| 0 | 1 | 4 | 4 | 1 | 2 | 4 |
| 1 | 4 | 0 | 4 | 2 | 2 | 0 |
| 2 | 2 | 1 | 2 | 3 | 0 | 2 |
Of course, the much easier way to do this very common operation is df['val1_times_val2'] = df['values1']*df['values2'], but there are times when you need to run more complex functions element-wise and, for those, apply() is really useful.
TipExercise
Write an apply function that raises entries in B to the power of entries in D.
Apply doesn’t just do this with lambda functions, it also works with custom functions. Below is a contrived example (which, in practice, you would do with df["E"] = df["E"] - 4). Note that we are specifying that the apply should be on a particular column by saying df["E"] on the right-hand side, but we could have alternatively done df.apply(lambda x: subtract_four(x["E"]), axis=1) and achieved the same outcome.
def subtract_four(input_number):
    return input_number - 4


df["sub_four_col"] = df["E"].apply(subtract_four)
df.head()| A | B | C | D | E | A_times_B | sub_four_col | |
|---|---|---|---|---|---|---|---|
| 0 | 1 | 4 | 4 | 1 | 2 | 4 | -2 |
| 1 | 4 | 0 | 4 | 2 | 2 | 0 | -2 |
| 2 | 2 | 1 | 2 | 3 | 0 | 2 | -4 |
Operations on DataFrames
Operations on whole dataframes are also supported, but if you’re doing very heavy lifting you might want to just switch to using numpy arrays (numpy provides fast numerical, vector, matrix, and tensor operations in Python; it has some similarities with the functionality of Matlab). As examples though, you can transpose and exponentiate easily:
df = pd.DataFrame(np.random.randint(0, 5, (3, 5)), columns=list("ABCDE"))
print("\n Dataframe:")
print(df)
print("\n Exponentiation:")
print(np.exp(df))
print("\n Transpose:")
print(df.T)
 Dataframe:
   A  B  C  D  E
0  4  1  1  4  4
1  0  0  1  4  1
2  0  0  1  1  0

 Exponentiation:
          A         B         C          D          E
0  54.59815  2.718282  2.718282  54.598150  54.598150
1   1.00000  1.000000  2.718282  54.598150   2.718282
2   1.00000  1.000000  2.718282   2.718282   1.000000

 Transpose:
   0  1  2
A  4  0  0
B  1  0  0
C  1  1  1
D  4  4  1
E  4  1  0
Column and Row Exercises
Using the flights data:
Compare
air_timewitharr_time - dep_time. What do you expect to see? What do you need to do to fix it?Compare
dep_time,sched_dep_time, anddep_delay. How would you expect those three numbers to be related?Brainstorm as many ways as possible to select
dep_time,dep_delay,arr_time, andarr_delayfromflights.What happens if you include the name of a row or column multiple times when trying to select them?
What does the
.isin()function do in the following?flights.columns.isin(["year", "month", "day", "dep_delay", "arr_delay"])Does the result of running the following code surprise you? How do functions like
str.contains()deal with case by default? How can you change that default?flights.loc[:, flights.columns.str.contains("TIME")](Hint: you can use help even on functions that apply to data frames, eg use
help(flights.columns.str.contains))